Custom instruction in the software toolchain
NB: in this section, we will build a 64-bit toolchain.
RISC-V default toolchain
In this first step, the default RISC-V toolchain is compiled, without modifications in the instructions set.
Some packages are needed:
$ sudo apt-get install autoconf automake autotools-dev curl python3 libmpc-dev libmpfr-dev libgmp-dev gawk build-essential bison flex texinfo gperf libtool patchutils bc zlib1g-dev libexpat-dev device-tree-compiler
Cloning the Linux kernel and its submodules:
$ git clone --recurse-submodules https://github.com/riscv/riscv-gnu-toolchain.git
Note
Around 7GB are needed to download all repositories.
It is assumed that the toolchain is built in /opt/riscv_custom:
$ cd riscv-gnu-toolchain
$ ./configure --prefix=/opt/riscv_custom
$ make -j$(nproc)
GCC cross-compiler version can be checked:
$ /opt/riscv_custom/bin/./riscv64-unknown-elf-gcc --version
riscv64-unknown-elf-gcc (g2ee5e430018) 12.2.0
Adding a custom instruction in the cross-compiler
Existing opcodes
Opcodes are defined in the riscv-opcodes directory:
$ git clone https://github.com/riscv/riscv-opcodes
This repository contains opcodes for differents instruction extensions (both 32-bit and 64-bit versions). This repository is organized as follows :
rv_abc: opcodes for theabc32-bit instructions.rv32_abc: other opcodes for theabcextension instructions.rv64_abc: additional 64-bit opcodes torv_abc32-bit instructions.
Here is a part of the rv_i file:
add     rd rs1 rs2 31..25=0  14..12=0 6..2=0x0C 1..0=3
sub     rd rs1 rs2 31..25=32 14..12=0 6..2=0x0C 1..0=3
sll     rd rs1 rs2 31..25=0  14..12=1 6..2=0x0C 1..0=3
Details of the add instruction are given in Figure 5.

Figure 5 add instruction breakdown
The opcode file contain values for funct7, funct3 and the opcode.
Custom instruction
It is assumed that a modulo instruction has to be added in RV32I which does not exist by default. The mnemonic for such an instruction would look like:
mod r1, r2, r3
# R[r1] = R[r2] % R[r3]

Figure 6 mod instruction breakdown
The opcode syntax would be:
mod rd rs1 rs2 31..25=1 14..12=0 6..2=2 1..0=3
According to Figure 1, mod uses the custom-0 opcode. It differs from [hsa] which used a reserved opcode. The rv_i file is modified as follows:
+ mod     rd rs1 rs2 31..25=1  14..12=0 6..2=2    1..0=3
add     rd rs1 rs2 31..25=0  14..12=0 6..2=0x0C 1..0=3
Then, opcode file is processed to get MATCH and MASK values:
$ make
This command will generate the representation of opcodes in several formats such as SystemVerilog, Chisel and C (in the encoding.out.h file). These values are a representation of the different field values. Going back to the add instruction:
#define MATCH_ADD 0x33
#define MASK_ADD  0xfe00707f
0000000 xxxxx xxxxx 000 xxxxx 0110011 // Add instruction breakdown
                               110011 // MATCH_ADD
1111111 00000 00000 111 00000 1111111 // MASK_ADD
Values related to the mod instruction are:
#define MATCH_MOD 0x200000b
#define MASK_MOD  0xfe00707f
0000001 xxxxx xxxxx 000 xxxxx 0001011 // Mod instruction breakdown
      1 00000 00000 000 00000 0001011 // MATCH_MOD
1111111 00000 00000 111 00000 1111111 // MASK_MOD
Same mask (instruction format is the same)
Match value can be checked with the binary representation of the instruction
Binutils modification
Now, binutils need to be aware of the new instruction. riscv-gnu-toolchain/riscv-binutils/include/opcode/riscv-opc.h is updated as follows:
/* Instruction opcode macros.  */
+ #define MATCH_MOD 0x200000b
+ #define MASK_MOD  0xfe00707f
#define MATCH_SLLI_RV32 0x1013
// [...]
#endif /* RISCV_ENCODING_H */
#ifdef DECLARE_INSN
+ DECLARE_INSN(mod, MATCH_MOD, MASK_MOD)
DECLARE_INSN(slli_rv32, MATCH_SLLI_RV32, MASK_SLLI_RV32)
The related C file (riscv-gnu-toolchain/riscv-binutils/opcodes/riscv-opc.c) has to be modified as well:
/* name, xlen, isa, operands, match, mask, match_func, pinfo.  */
+ {"mod",         0, INSN_CLASS_I, "d,s,t",     MATCH_MOD, MASK_MOD, match_opcode, 0 },
{"unimp",       0, INSN_CLASS_C, "",          0, 0xffffU, match_opcode, INSN_ALIAS },
name: name of the instruction.xlen: width of an integer register in bits.isa: ISA extension (I in this case).operands: based on the parsing available inriscv-gnu-toolchain/riscv-binutils/gas/config/tc-riscv.c:
switch (*fmt++)
{
      case 'd':
      INSERT_OPERAND (RD, insn, va_arg (args, int));
      continue;

      case 's':
      INSERT_OPERAND (RS1, insn, va_arg (args, int));
      continue;

      case 't':
      INSERT_OPERAND (RS2, insn, va_arg (args, int));
      continue;
match: the match value.maskthe mask value.match_funcpointer to the function recoveringfunct7,funct3andopcodefields of the instruction.
static int
match_opcode (const struct riscv_opcode *op, insn_t insn)
{
    return ((insn ^ op->match) & op->mask) == 0;
}
pinfo: this field is equal to 0 most of the time except for branch/jump instructions:
{"j",   0, INSN_CLASS_I, "a",        MATCH_JAL,
           MASK_JAL|MASK_RD, match_opcode, INSN_ALIAS|INSN_BRANCH },
{"beq", 0, INSN_CLASS_C, "Cs,Cz,Cp", MATCH_C_BEQZ,
           MASK_C_BEQZ, match_opcode, INSN_ALIAS|INSN_CONDBRANCH },
{"and", 0, INSN_CLASS_C, "Cs,Cw,Ct", MATCH_C_AND,
           MASK_C_AND, match_opcode, INSN_ALIAS },
{"and", 0, INSN_CLASS_C, "Cs,Cw,Ct", MATCH_C_AND,
           MASK_C_AND, match_opcode, INSN_ALIAS },
These INSN_ constants are defined in riscv-gnu-toolchain/riscv-binutils/include/opcode/riscv.h:
/* Instruction is a simple alias (e.g. "mv" for "addi").  */
#define INSN_ALIAS      0x00000001
/* Instruction is an unconditional branch.  */
#define INSN_BRANCH     0x00000002
/* Instruction is a conditional branch.  */
#define INSN_CONDBRANCH 0x00000004
Testing the new instruction
The final step is to recompile the custom instruction that has been implemented.
$ pwd
[...]/riscv-gnu-toolchain
$ make clean
$ make -j$(nproc)
Here is a sample C code (taken from [nitb]) using the freshmly implemented mod instruction:
#include <stdio.h>
int main(){
    int a,b,c;
    a = 5;
    b = 2;
    asm volatile
    (
    "mod   %[z], %[x], %[y]\n\t"
    : [z] "=r" (c)
    : [x] "r" (a), [y] "r" (b)
    );
    if ( c != 1 ){
            printf("\n[[FAILED]]\n");
            return -1;
    }
    printf("\n[[PASSED]]\n");
    return 0;
}
If the C file is compiled, it should be successful:
$ /opt/riscv_custom/bin/riscv64-unknown-elf-gcc main.c -o main
$ file main
main: ELF 64-bit LSB executable, UCB RISC-V, version 1 (SYSV), statically linked, not stripped
Remark: even if rv32i opcodes are modified, it works as there is the mod instruction in line 77 of the objdump:
$ /opt/riscv_custom/bin/riscv64-unknown-elf-objdump -D main | grep -n -A 20 "<main>:"
80:00000000000101a2 <main>:
81-   101a2:        1101                    addi    sp,sp,-32
82-   101a4:        ec06                    sd      ra,24(sp)
83-   101a6:        e822                    sd      s0,16(sp)
84-   101a8:        1000                    addi    s0,sp,32
85-   101aa:        4795                    li      a5,5
86-   101ac:        fef42623                sw      a5,-20(s0)
87-   101b0:        4789                    li      a5,2
88-   101b2:        fef42423                sw      a5,-24(s0)
89-   101b6:        fec42783                lw      a5,-20(s0)
90-   101ba:        fe842703                lw      a4,-24(s0)
91-   101be:        02e7878b                mod     a5,a5,a4
92-   101c2:        fef42223                sw      a5,-28(s0)
93-   101c6:        fe442783                lw      a5,-28(s0)
94-   101ca:        0007871b                sext.w  a4,a5
95-   101ce:        4785                    li      a5,1
96-   101d0:        00f70963                beq     a4,a5,101e2 <main+0x40>
97-   101d4:        67c9                    lui     a5,0x12
98-   101d6:        67878513                addi    a0,a5,1656 # 12678 <__errno+0x8>
99-   101da:        1b2000ef                jal     ra,1038c <puts>
100-   101de:       57fd                    li      a5,-1
In others words, it is a RISC-V binary compiled with a custom instruction!
Adding a custom instruction in Spike
Two tools needs to be installed:
Spike, the simulator itself
PK, the RISC-V proxy kernel which is a piece of software that can host statically-linked binaries
Compiling and executing an Hello world! program
# RISCV tools path
$ export RISCV=/opt/riscv_custom
$ export PATH=$RISCV/bin:$PATH
# Spike install
$ git clone https://github.com/riscv-software-src/riscv-isa-sim
$ cd riscv-isa-sim
$ mkdir build
$ cd build
$ ../configure --prefix=$RISCV
$ make -j$(nproc)
$ sudo make install
# PK install
$ git clone https://github.com/riscv-software-src/riscv-pk
$ mkdir build
$ cd build
$ ../configure --prefix=$RISCV --host=riscv64-unknown-elf
$ make -j$(nproc)
$ sudo make install
$ export PATH=$RISCV/riscv64-unknown-elf/bin:$PATH
Both tools should be available in PATH variable with previous commands. Now, for a simple “Hello world!” program:
#include <stdio.h>
int main()
{
    printf("Hello world!\n");
    return 0;
}
$ riscv64-unknown-elf-gcc -o hello hello.c
$ spike pk hello
bbl loader
Hello world!
Adding an instruction in the simulator
First of all, describe the behavior of the new instruction by adding a file in riscv-isa-sim/riscv/insns/mod.h. Here is the add.h syntax:
WRITE_RD(sext_xlen(RS1 + RS2));
The equivalent mod.h file will be:
WRITE_RD(sext_xlen(RS1 % RS2));
In riscv-isa-sim/riscv/encoding.h, add MATCH_MOD and MATCH_MOD as for the compiler:
@@ -361,6 +361,8 @@
#define MASK_ANDI  0x707f
#define MATCH_ADD 0x33
#define MASK_ADD  0xfe00707f
+ #define MATCH_MOD 0x200000b
+ #define MASK_MOD  0xfe00707f

@@ -3122,6 +3124,7 @@ DECLARE_INSN(xori, MATCH_XORI, MASK_XORI)
DECLARE_INSN(ori, MATCH_ORI, MASK_ORI)
DECLARE_INSN(andi, MATCH_ANDI, MASK_ANDI)
DECLARE_INSN(add, MATCH_ADD, MASK_ADD)
+ DECLARE_INSN(mod, MATCH_MOD, MASK_MOD)
Then, Makefile needs to compile the mod instruction. In riscv-isa-sim/riscv/riscv.mk.in:
@@ -68,6 +68,7 @@ riscv_gen_hdrs = \
riscv_insn_ext_i = \
add \
+ mod \
The last file to be modified is riscv-isa-sim/disasm/disasm.cc where instruction types are defined:
@@ -773,6 +773,7 @@ disassembler_t::disassembler_t(int xlen)
DEFINE_ITYPE_SHIFT(sraiw);

DEFINE_RTYPE(add);
+ DEFINE_RTYPE(mod);
DEFINE_RTYPE(sub);
The last step is to rebuild the simulator and test the program given in “Testing the new instruction” section.
spike pk main
bbl loader
[[PASSED]]
Adding a custom instruction in gem5
Both references [gema, gemb] contain a first part where it show how to boot a default architecture. In a second step, documents show how to modify and extend gem5. First of all, this document focuses on x86, RISC-V will be the key point of another section. This report contains some notes about those two steps. It may also include some elements from Nitish’s blog [nita].
Introduction
gem5is a simulator platform written in C++ and Python.It can simulate several architectures including x86, ARM and RISC-V.
Getting started with x86 simulation
Building gem5
Some packages are needed on an Ubuntu-based system:
$ sudo apt install build-essential git m4 scons zlib1g zlib1g-dev libprotobuf-dev protobuf-compiler libprotoc-dev libgoogle-perftools-dev python-dev python
Then, the source code:
$ git clone https://gem5.googlesource.com/public/gem5
The first build will be an x86-based system (gem5 must be compiled for each ISA to be simulated).
$ python3 `which scons` build/X86/gem5.opt -j4
This script basically behaves like a configure+Makefile flow. At the end:
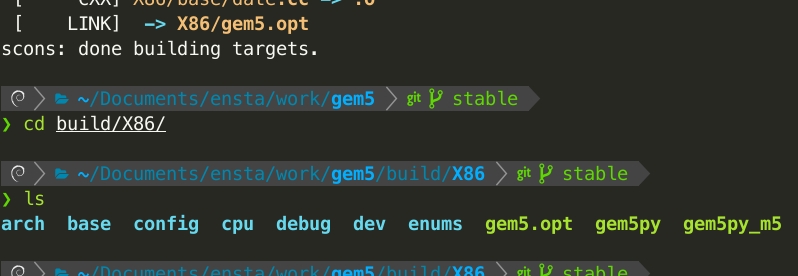
Figure 7 gem5 compilation output
Simple script
This section shows how to setup a simple configuratin script for gem5 composed of a simple CPU core, a memory bus and a DDR3.
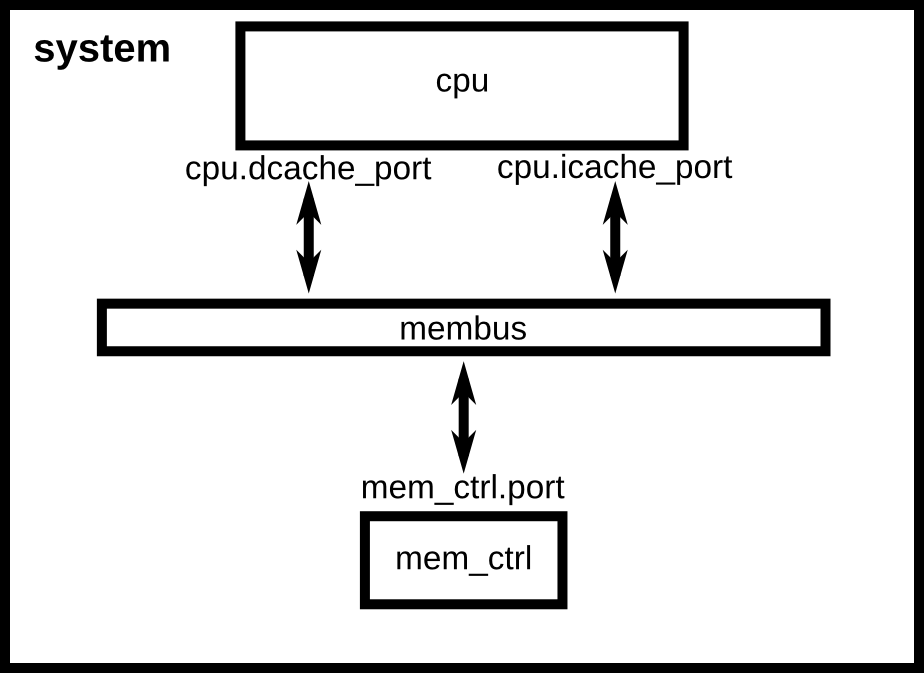
Figure 8 Architecture described in the simple script
Here is the full script:
# import the m5 (gem5) library created when gem5 is built
import m5
# import all of the SimObjects
from m5.objects import *
# create the system we are going to simulate
system = System()
# Set the clock fequency of the system (and all of its children)
system.clk_domain = SrcClockDomain()
system.clk_domain.clock = '1GHz'
system.clk_domain.voltage_domain = VoltageDomain()
# Set up the system
system.mem_mode = 'timing'               # Use timing accesses
system.mem_ranges = [AddrRange('512MB')] # Create an address range
# Create a simple CPU
system.cpu = TimingSimpleCPU()
# Create a memory bus, a system crossbar, in this case
system.membus = SystemXBar()
# Hook the CPU ports up to the membus
system.cpu.icache_port = system.membus.cpu_side_ports
system.cpu.dcache_port = system.membus.cpu_side_ports
# create the interrupt controller for the CPU and connect to the membus
system.cpu.createInterruptController()
# For x86 only, make sure the interrupts are connected to the memory
# Note: these are directly connected to the memory bus and are not cached
if m5.defines.buildEnv['TARGET_ISA'] == "x86":
system.cpu.interrupts[0].pio = system.membus.mem_side_ports
system.cpu.interrupts[0].int_requestor = system.membus.cpu_side_ports
system.cpu.interrupts[0].int_responder = system.membus.mem_side_ports
# Create a DDR3 memory controller and connect it to the membus
system.mem_ctrl = MemCtrl()
system.mem_ctrl.dram = DDR3_1600_8x8()
system.mem_ctrl.dram.range = system.mem_ranges[0]
system.mem_ctrl.port = system.membus.mem_side_ports
# Connect the system up to the membus
system.system_port = system.membus.cpu_side_ports
# get ISA for the binary to run.
isa = str(m5.defines.buildEnv['TARGET_ISA']).lower()
# Default to running 'hello', use the compiled ISA to find the binary
# grab the specific path to the binary
thispath = os.path.dirname(os.path.realpath(__file__))
binary = os.path.join(thispath, '../../../',
'tests/test-progs/hello/bin/', isa, 'linux/hello')
system.workload = SEWorkload.init_compatible(binary)
# Create a process for a simple "Hello World" application
process = Process()
# Set the command
# cmd is a list which begins with the executable (like argv)
process.cmd = [binary]
# Set the cpu to use the process as its workload and create thread contexts
system.cpu.workload = process
system.cpu.createThreads()
# set up the root SimObject and start the simulation
root = Root(full_system = False, system = system)
# instantiate all of the objects we've created above
m5.instantiate()
print("Beginning simulation!")
exit_event = m5.simulate()
print('Exiting @ tick %i because %s' % (m5.curTick(), exit_event.getCause()))
If this script is run with the freshly compiled gem5 :
$ ./build/X86/gem5.opt configs/learning_gem5/part1/simple.py
gem5 Simulator System.  https://www.gem5.org
gem5 is copyrighted software; use the --copyright option for details.

gem5 version 22.0.0.2
gem5 compiled Dec 23 2022 14:25:14
gem5 started Dec 23 2022 17:41:35
gem5 executing on test-VirtualBox, pid 24543
command line: ./build/X86/gem5.opt configs/learning_gem5/part1/simple.py

Global frequency set at 1000000000000 ticks per second
warn: No dot file generated. Please install pydot to generate the dot file and pdf.
build/X86/mem/dram_interface.cc:690: warn: DRAM device capacity (8192 Mbytes) does not match the address range assigned (512 Mbytes)
0: system.remote_gdb: listening for remote gdb on port 7000
Beginning simulation!
build/X86/sim/simulate.cc:194: info: Entering event queue @ 0.  Starting simulation...
Hello world!
Exiting @ tick 499462000 because exiting with last active thread context
Yay, “Hello world” is alive!
Add cache to the script
Cache script:
import m5
from m5.objects import Cache
# Add the common scripts to our path
m5.util.addToPath('../../')
from common import SimpleOpts
# Some specific options for caches
# For all options see src/mem/cache/BaseCache.py
class L1Cache(Cache):
"""Simple L1 Cache with default values"""
assoc = 2
tag_latency = 2
data_latency = 2
response_latency = 2
mshrs = 4
tgts_per_mshr = 20
def __init__(self, options=None):
super(L1Cache, self).__init__()
pass
def connectBus(self, bus):
"""Connect this cache to a memory-side bus"""
self.mem_side = bus.cpu_side_ports
def connectCPU(self, cpu):
"""Connect this cache's port to a CPU-side port
This must be defined in a subclass"""
raise NotImplementedError
class L1ICache(L1Cache):
"""Simple L1 instruction cache with default values"""
# Set the default size
size = '16kB'
SimpleOpts.add_option('--l1i_size',
help="L1 instruction cache size. Default: %s" % size)
def __init__(self, opts=None):
super(L1ICache, self).__init__(opts)
if not opts or not opts.l1i_size:
return
self.size = opts.l1i_size
def connectCPU(self, cpu):
"""Connect this cache's port to a CPU icache port"""
self.cpu_side = cpu.icache_port
class L1DCache(L1Cache):
"""Simple L1 data cache with default values"""
# Set the default size
size = '64kB'
SimpleOpts.add_option('--l1d_size',
help="L1 data cache size. Default: %s" % size)
def __init__(self, opts=None):
super(L1DCache, self).__init__(opts)
if not opts or not opts.l1d_size:
return
self.size = opts.l1d_size
def connectCPU(self, cpu):
"""Connect this cache's port to a CPU dcache port"""
self.cpu_side = cpu.dcache_port
class L2Cache(Cache):
"""Simple L2 Cache with default values"""
# Default parameters
size = '256kB'
assoc = 8
tag_latency = 20
data_latency = 20
response_latency = 20
mshrs = 20
tgts_per_mshr = 12
SimpleOpts.add_option('--l2_size', help="L2 cache size. Default: %s" % size)
def __init__(self, opts=None):
super(L2Cache, self).__init__()
if not opts or not opts.l2_size:
return
self.size = opts.l2_size
def connectCPUSideBus(self, bus):
self.cpu_side = bus.mem_side_ports
def connectMemSideBus(self, bus):
self.mem_side = bus.cpu_side_ports
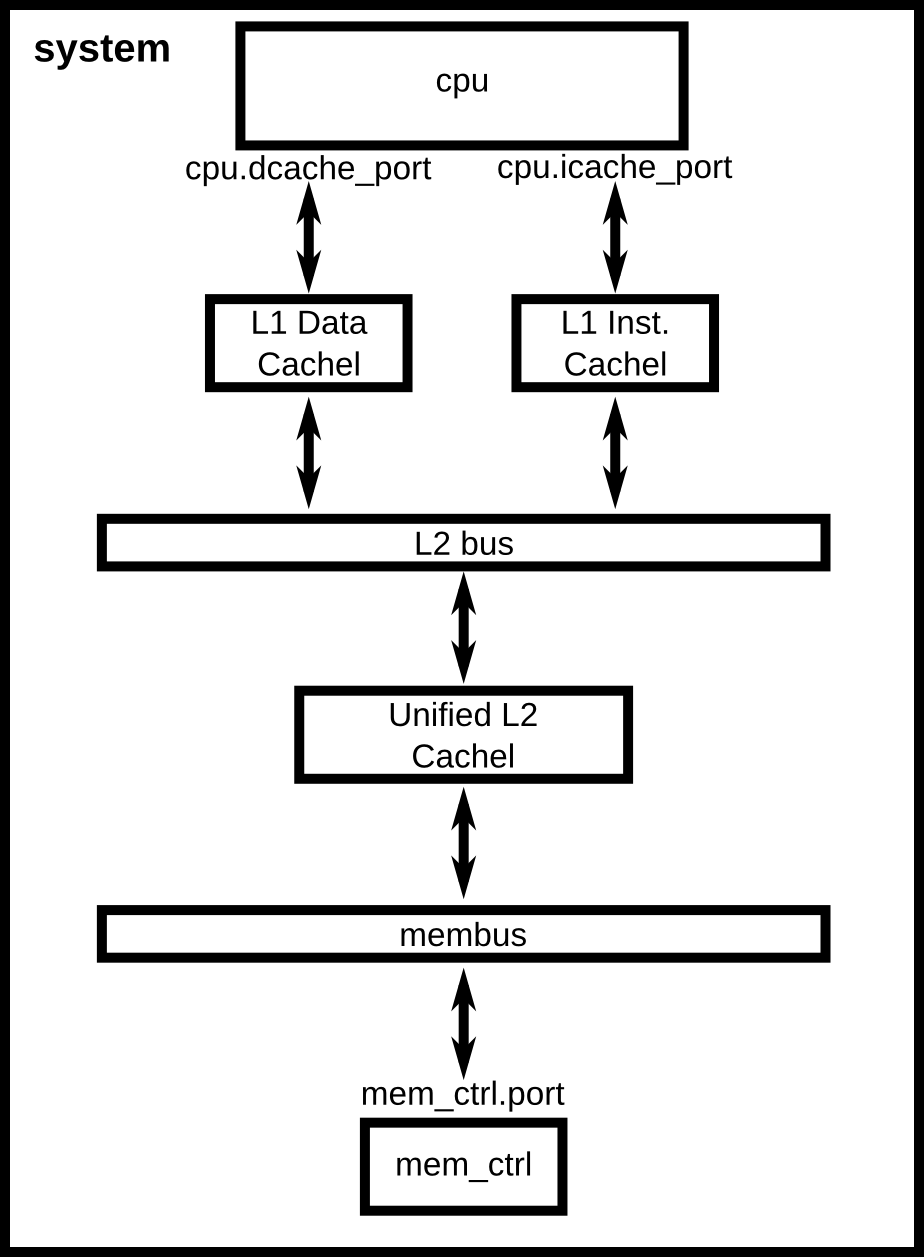
Figure 9 Architecture described in the advanced script
Top script for the two-level cache:
# import the m5 (gem5) library created when gem5 is built
import m5
# import all of the SimObjects
from m5.objects import *
# Add the common scripts to our path
m5.util.addToPath('../../')
# import the caches which we made
from caches import *
# import the SimpleOpts module
from common import SimpleOpts
# get ISA for the default binary to run. This is mostly for simple testing
isa = str(m5.defines.buildEnv['TARGET_ISA']).lower()
# Default to running 'hello', use the compiled ISA to find the binary
# grab the specific path to the binary
thispath = os.path.dirname(os.path.realpath(__file__))
default_binary = os.path.join(thispath, '../../../',
'tests/test-progs/hello/bin/', isa, 'linux/hello')
# Binary to execute
SimpleOpts.add_option("binary", nargs='?', default=default_binary)
# Finalize the arguments and grab the args so we can pass it on to our objects
args = SimpleOpts.parse_args()
# create the system we are going to simulate
system = System()
# Set the clock fequency of the system (and all of its children)
system.clk_domain = SrcClockDomain()
system.clk_domain.clock = '1GHz'
system.clk_domain.voltage_domain = VoltageDomain()
# Set up the system
system.mem_mode = 'timing'               # Use timing accesses
system.mem_ranges = [AddrRange('512MB')] # Create an address range
# Create a simple CPU
system.cpu = TimingSimpleCPU()
# Create an L1 instruction and data cache
system.cpu.icache = L1ICache(args)
system.cpu.dcache = L1DCache(args)
# Connect the instruction and data caches to the CPU
system.cpu.icache.connectCPU(system.cpu)
system.cpu.dcache.connectCPU(system.cpu)
# Create a memory bus, a coherent crossbar, in this case
system.l2bus = L2XBar()
# Hook the CPU ports up to the l2bus
system.cpu.icache.connectBus(system.l2bus)
system.cpu.dcache.connectBus(system.l2bus)
# Create an L2 cache and connect it to the l2bus
system.l2cache = L2Cache(args)
system.l2cache.connectCPUSideBus(system.l2bus)
# Create a memory bus
system.membus = SystemXBar()
# Connect the L2 cache to the membus
system.l2cache.connectMemSideBus(system.membus)
# create the interrupt controller for the CPU
system.cpu.createInterruptController()
# For x86 only, make sure the interrupts are connected to the memory
# Note: these are directly connected to the memory bus and are not cached
if m5.defines.buildEnv['TARGET_ISA'] == "x86":
system.cpu.interrupts[0].pio = system.membus.mem_side_ports
system.cpu.interrupts[0].int_requestor = system.membus.cpu_side_ports
system.cpu.interrupts[0].int_responder = system.membus.mem_side_ports
# Connect the system up to the membus
system.system_port = system.membus.cpu_side_ports
# Create a DDR3 memory controller
system.mem_ctrl = MemCtrl()
system.mem_ctrl.dram = DDR3_1600_8x8()
system.mem_ctrl.dram.range = system.mem_ranges[0]
system.mem_ctrl.port = system.membus.mem_side_ports
system.workload = SEWorkload.init_compatible(args.binary)
# Create a process for a simple "Hello World" application
process = Process()
# Set the command
# cmd is a list which begins with the executable (like argv)
process.cmd = [args.binary]
# Set the cpu to use the process as its workload and create thread contexts
system.cpu.workload = process
system.cpu.createThreads()
# set up the root SimObject and start the simulation
root = Root(full_system = False, system = system)
# instantiate all of the objects we've created above
m5.instantiate()
print("Beginning simulation!")
exit_event = m5.simulate()
print('Exiting @ tick %i because %s' % (m5.curTick(), exit_event.getCause()))
Then, the script is executed:
$ ./build/X86/gem5.opt configs/learning_gem5/part1/two_level.py --l2_size='1MB' --l1d_size='128kB'
gem5 Simulator System.  https://www.gem5.org
gem5 is copyrighted software; use the --copyright option for details.

gem5 version 22.0.0.2
gem5 compiled Dec 23 2022 14:25:14
gem5 started Dec 23 2022 17:43:24
gem5 executing on test-VirtualBox, pid 24632
command line: ./build/X86/gem5.opt configs/learning_gem5/part1/two_level.py --l2_size=1MB --l1d_size=128kB

Global frequency set at 1000000000000 ticks per second
warn: No dot file generated. Please install pydot to generate the dot file and pdf.
build/X86/mem/dram_interface.cc:690: warn: DRAM device capacity (8192 Mbytes) does not match the address range assigned (512 Mbytes)
0: system.remote_gdb: listening for remote gdb on port 7000
Beginning simulation!
build/X86/sim/simulate.cc:194: info: Entering event queue @ 0.  Starting simulation...
Hello world!
Exiting @ tick 58125000 because exiting with last active thread context
Analyzing outputs
When a simulation is launched, there are several files generated in the m5out sub-directory. The most interesting one (stats.txt) includes statistics about the generated system execution. First, some statistics about the execution:
----------- Begin Simulation Statistics ----------
simSeconds  0.000058    # Number of seconds simulated (Second)
simTicks    58125000    # Number of ticks simulated (Tick)
[...]
Then, statistics about cache hits/misses:
system.cpu.dcache.overallHits::cpu.data     1951    # number of overall hits (Count)
system.cpu.dcache.demandMisses::cpu.data    136     # number of demand (read+write) misses (Count)
[...]
And finally, about the memory controller:
system.mem_ctrl.readReqs    365 # Number of read requests accepted (Count)
system.mem_ctrl.writeReqs   0   # Number of write requests accepted (Count)
[...]
Using default configuration scripts
Configuration scripts can be found in code{configs}. Some directories:
dram: DRAM test scripts.example: plug-and-play examples.learning_gem5: scripts that were used in previous paragraphs.
Playing with the se.py script
$ ./build/X86/gem5.opt configs/example/se.py --cmd=tests/test-progs/hello/bin/x86/linux/hello
Hello world!
Exiting @ tick 5943000 because exiting with last active thread context
CPU type can be changed. A time difference can be observed:
$ ./build/X86/gem5.opt configs/example/se.py --cmd=tests/test-progs/hello/bin/x86/linux/hello --cpu-type=TimingSimpleCPU --l1d_size=64kB --l1i_size=16kB
Hello world!
Exiting @ tick 454646000 because exiting with last active thread context
These parameters can be found in m5out/config.ini:
[system.cpu]
type=TimingSimpleCPU
[system]
cache_line_size=64
Getting started with RISC-V simulation
gem5 proposes some pre-compiled RISC-V binaries:
$ mkdir -p cpu_tests/benchmarks/bin/riscv
$ cd cpu_tests/benchmarks/bin/riscv
$ wget dist.gem5.org/dist/v22-0/test-progs/cpu-tests/bin/riscv/Bubblesort
$ wget dist.gem5.org/dist/v22-0/test-progs/cpu-tests/bin/riscv/FloatMM
Then, gem5 has to be built for RISC-V:
$ scons build/RISCV/gem5.opt -j4
It should create a gem5 RISC-V binary at build/RISC-V/gem5.opt. Then, a RISC-V binary can be run by modifying a single line in the simple.py script:
process.cmd = ['tests/test-progs/hello/bin/riscv/linux/hello']
$ ./build/RISCV/gem5.opt configs/learning_gem5/part1/simple-riscv.py
gem5 Simulator System.  https://www.gem5.org
gem5 is copyrighted software; use the --copyright option for details.

gem5 version 22.0.0.2
gem5 compiled Dec 24 2022 10:54:42
gem5 started Dec 24 2022 11:01:22
gem5 executing on test-VirtualBox, pid 20699
command line: ./build/RISCV/gem5.opt configs/learning_gem5/part1/simple.py

Global frequency set at 1000000000000 ticks per second
warn: No dot file generated. Please install pydot to generate the dot file and pdf.
build/RISCV/mem/dram_interface.cc:690: warn: DRAM device capacity (8192 Mbytes) does not match the address range assigned (512 Mbytes)
0: system.remote_gdb: listening for remote gdb on port 7000
Beginning simulation!
build/RISCV/sim/simulate.cc:194: info: Entering event queue @ 0.  Starting simulation...
build/RISCV/sim/syscall_emul.hh:1015: warn: readlink() called on '/proc/self/exe' may yield unexpected results in various settings.
      Returning '/home/test/Documents/gem5/tests/test-progs/hello/bin/riscv/linux/hello'
build/RISCV/sim/mem_state.cc:443: info: Increasing stack size by one page.
Hello world!
Exiting @ tick 446784000 because exiting with last active thread context
Adding a custom instruction in the RISC-V ISA
The only thing is to add our mod instruction in the decoder file located at src/arch/riscv/isa/decoder.isa. For this purpose, instruction details were given in a previous section.
funct7= 0x1.funct3= 0x2.opcode= 0x02 (lowest 2 bits11are not taken into account).
Basic structure of the decoder can be described as follows:
decode QUADRANT default Unknown::unknown() {
    0x0: decode COPCODE { /* compressed opcodes */
    0x1: decode COPCODE { /* compressed opcodes */
    0x2: decode COPCODE { /* compressed opcodes */
    0x3: decode OPCODE  { /* regular opcodes <= our target! */
    }
In other words, the new instruction has the following properties:
In a regular opcode $Rightarrow$
0x02: decode FUNCT3 {.With
funct3=0x0.With
funct7=0x1.For a R-type instruction (
addis a good example).
@@ -420,7 +420,16 @@ decode QUADRANT default Unknown::unknown() {
}}, inst_flags=FloatMemReadOp);
}
}
+   0x02: decode FUNCT3 {
+           format ROp {
+                   0x0: decode FUNCT7 {
+                           0x1: mod({{
+                                   Rd = Rs1_sd % Rs2_sd;
+                                   }});
+                           }
+                   }
+           }
0x03: decode FUNCT3 {
Finally, gem5 is recompiled to be able to re-run the small code shown in a previous section.
$ scons build/RISCV/gem5.opt -j4
$./build/RISCV/gem5.opt configs/learning_gem5/part1/custom_inst.py
gem5 Simulator System.  http://gem5.org
gem5 is copyrighted software; use the --copyright option for details.

gem5 version 21.2.0.0
gem5 compiled Jan  5 2022 17:34:18
gem5 started Jan  5 2022 23:42:52
gem5 executing on debian, pid 22660
command line: ./build/RISCV/gem5.opt configs/learning_gem5/part1/custom_inst.py

Global frequency set at 1000000000000 ticks per second
build/RISCV/mem/mem_interface.cc:791: warn: DRAM device capacity (8192 Mbytes) does not match the address range assigned (512 Mbytes)
build/RISCV/arch/riscv/linux/se_workload.cc:60: warn: Unknown operating system; assuming Linux.
0: system.remote_gdb: listening for remote gdb on port 7000
Beginning simulation!
build/RISCV/sim/simulate.cc:194: info: Entering event queue @ 0.  Starting simulation...

[[PASSED]]
Exiting @ tick 145484000 because exiting with last active thread context
Simulation of a 32-bit binary with Spike
Adding an instruction while working on 32-bit binaries would follow the same steps as the file to be modified is the RV32I opcodes file. The main difference is on the tools:
Cross-compiler must be 32-bits.
Spike is already ready to handle 32-bit binaries.
RISC-V proxy kernel needs to be recompiled for 32-bit.
Cross-compiler compilation:
$ git clone https://github.com/riscv/riscv-gnu-toolchain
$ cd riscv-gnu-toolchain
$ ./configure --prefix=/opt/riscv32_custom --with-arch=rv32gc --with-abi=ilp32d
$ make
Proxy kernel compilation:
$ git clone https://github.com/riscv-software-src/riscv-pk
$ mkdir build
$ cd build
$ ../configure --prefix=$RISCV --host=riscv32-unknown-elf \
                                             --with-arch=rv32gc --with-abi=ilp32d
$ make
$ make install
Simulation with Spike:
$ spike --isa=RV32GC pk my_binary